รู้จักกับระบบฐานข้อมูลในแอพ
อย่างแรกที่ต้องรู้คือ ฐานข้อมูลในแอพ ไม่เหมือนฐานข้อมูลบนเซิฟเวอร์ (Database Server)
- ตัวฐานข้อมูลจะเก็บอยู่ในรูปแบบของไฟล์ (ใกล้เคียงที่สุด ให้ลองนึกถึง Microsoft Access)
- ตัวฐานข้อมูลไม่มีการทำงานอยู่ตลอดเวลา จะถูกเข้าถึงตามโค้ดที่เขียนไว้เท่านั้น (ก็มันเป็นไฟล์ธรรมดานี่นะ)
- ถ้าแอพโดนลบ ตัว SQLite Database จะปลิวไปด้วย
ดังนั้นเราไม่ควรบันทึกข้อมูลที่สำคัญระดับขอขาดบาดตายไว้ในแอพ ส่วนใหญ่ก็จะส่งไปเก็บไว้ที่ Database server ผ่าน Web service
ข้อมูลปลอดภัย ไม่ต้องกลัวว่าลบแอพ แล้วข้อมูลจะหาย เป็นสิ่งที่ผู้คนที่ใช้แอพในปัจจุบันเข้าใจเป็นอย่างดี
ขั้นตอนง่ายๆ เชื่อมต่อกับ SQLite Database ใน Ionic Framework
เอาล่ะ ว่าแล้วเรามาลองทำแอพง่ายๆ ด้วย Ionic Framework โดยให้เก็บข้อมูลลงเจ้า SQlite database กัน
โดยในที่นี้ให้เราสร้างโปรเจค Ionic Framework ใหม่ และติดตั้ง ngCordova ให้เรียบร้อย (ใครยังไม่รู้วิธีติดตั้ง ngCordova คลิกดูที่นี่)
1. ติดตั้ง SQLite Plugin
เราจะทำการติดตั้ง plugin SQLite โดยใช้คำสั่ง
cordova plugin add https://github.com/brodysoft/Cordova-SQLitePlugin.git
เรียบร้อยแล้วก็อย่าลืมใส่ ngcordova.min.js ใน index.html
 <script src="lib/ngCordova/dist/ng-cordova.min.js"></script>
 <script src="cordova.js"></script>
2. สร้างตัวแปร ‘db’
ในที่นี้เราจะสร้างตัวแปรง่ายๆ มาเพื่อใช้จัดการฐานข้อมูล รวมถึงการทำงานกับ SQL Statement (Execute SQL Statement) โดยการประกาศเป็นตัวแปร global ไว้ในไฟล์ app.js
// Database instance.
var db;
3. สร้าง/เชื่อมต่อกับฐานข้อมูล
จากนั้นเราจะทำการสร้าง/เปิดการเชื่อมต่อกับฐานข้อมูล โดยใช้ $cordovaSQLite.openDB() ใน method run() ของ module ตามตัวอย่างด้านล่าง
// Include dependency: ngCordova
angular.module('starter', ['ionic', 'ngCordova'])

.run(function($ionicPlatform, $cordovaSQLite) {
    $ionicPlatform.ready(function() {


        // Important!!
        //
        // Instantiate database file/connection after ionic platform is ready.
        //
        db = $cordovaSQLite.openDB("nextflow.db");
        $cordovaSQLite.execute(db, 'CREATE TABLE IF NOT EXISTS Messages (id INTEGER PRIMARY KEY AUTOINCREMENT, message TEXT)');


    });
})
โดยระบุชื่อไฟล์ฐานข้อมูล SQLite ให้เป็นชื่อ nextflow.db
// Include dependency: ngCordova
angular.module('starter', ['ionic', 'ngCordova'])

.run(function($ionicPlatform, $cordovaSQLite) {
    $ionicPlatform.ready(function() {


        // Important!!
        //
        // Instantiate database file/connection after ionic platform is ready.
        //
        db = $cordovaSQLite.openDB("nextflow.db");
        $cordovaSQLite.execute(db, 'CREATE TABLE IF NOT EXISTS Messages (id INTEGER PRIMARY KEY AUTOINCREMENT, message TEXT)');


    });
})
แล้วก็ทำการสร้าง Table ขึ้นมา 1 table เพื่อเก็บข้อมูลครับ
// Include dependency: ngCordova
angular.module('starter', ['ionic', 'ngCordova'])

.run(function($ionicPlatform, $cordovaSQLite) {
    $ionicPlatform.ready(function() {


        // Important!!
        //
        // Instantiate database file/connection after ionic platform is ready.
        //
        db = $cordovaSQLite.openDB("nextflow.db");
        $cordovaSQLite.execute(db, 'CREATE TABLE IF NOT EXISTS Messages (id INTEGER PRIMARY KEY AUTOINCREMENT, message TEXT)');


    });
})
4. สร้างแบบฟอร์มรับ/แสดงข้อมูลจากฐานข้อมูล SQLite ของ Ionic
มาถึงตรงนี้ฐานข้อมูล SQLite ของเราพร้อมแล้ว เราจะทำการสร้าง Form ไว้ที่ index.html และมีปุ่ม 2 ปุ่ม นั่นคือปุ่ม Save (ไว้สำหรับบันทึกข้อมูล) และปุ่ม Load (ไว้เรียกข้อมูลออกมาแสดง)
<ion-content padding="true">
    <div class="list">
        <label class="item item-input">
            <span class="input-label">Message: </span>
            <input type="text" ng-model="newMessage">
        </label>
    </div>
    <div>
        <button class="button button-block" ng-click="save(newMessage)">
            Save
        </button>
        <button class="button button-block" ng-click="load()">
            Load
        </button>
        <p>{{ statusMessage }}</p>
    </div>
</ion-content>
5. รับข้อมูลและบันทึกลงฐานข้อมูล SQLite ของ Ionic
สร้าง method ในฝั่งของ Angular JS เพื่อบันทึกข้อความลง SQLite โดยในที่นี้ method ชื่อว่า save() ครับ
และทำการเรียกใช้งาน method ของ $cordovaSQLite ที่ชื่อ execute โดยใส่ INSERT Statement ลงไป
จะสังเกตว่ารูปแบบการเขียนคล้ายกับที่ใช้บน Database Server อย่าง MySQL, Microsoft SQL Server, หรือ Oracle
$scope.save = function(newMessage) {

    $cordovaSQLite.execute(db, 'INSERT INTO Messages (message) VALUES (?)', [newMessage])
        .then(function(result) {
            $scope.statusMessage = "Message saved successful, cheers!";
        }, function(error) {
            $scope.statusMessage = "Error on saving: " + error.message;
        })

}
6. โหลดข้อมูลจากฐานข้อมูล SQLite ของ Ionic
ในฝั่งของปุ่ม Load เราก็จะสร้าง method ที่ชื่อว่า load() ขึ้นมา โดยเราเรียกใช้ method ของ $cordovaSQLite อีกเช่นเคย แต่เราใช้ SELECT statement แทน
$scope.load = function() {

        // Execute SELECT statement to load message from database.
        $cordovaSQLite.execute(db, 'SELECT * FROM Messages ORDER BY id DESC')
            .then(
                function(result) {

                    if (result.rows.length > 0) {

                        $scope.newMessage = result.rows.item(0).message;
                        $scope.statusMessage = "Message loaded successful, cheers!";
                    }
                },
                function(error) {
                    $scope.statusMessage = "Error on loading: " + error.message;
                }
            );
    }
ซึ่งค่าที่กลับมาจาก SQLite ของ Ionic จะอยู่ในรูปแบบของ property ที่ชื่อ result.rows ครับ
$scope.load = function() {

        // Execute SELECT statement to load message from database.
        $cordovaSQLite.execute(db, 'SELECT * FROM Messages ORDER BY id DESC')
            .then(
                function(result) {

                    if (result.rows.length > 0) {

                        $scope.newMessage = result.rows.item(0).message;
                        $scope.statusMessage = "Message loaded successful, cheers!";
                    }
                },
                function(error) {
                    $scope.statusMessage = "Error on loading: " + error.message;
                }
            );
    }
โดยจะเห็นว่าเราสามารถดึงค่าของ Column ใน Table ออกมาได้เหมือนกับ property ของ Javascript ทั่วไป
$scope.load = function() {

        // Execute SELECT statement to load message from database.
        $cordovaSQLite.execute(db, 'SELECT * FROM Messages ORDER BY id DESC')
            .then(
                function(result) {

                    if (result.rows.length > 0) {

                        $scope.newMessage = result.rows.item(0).message;
                        $scope.statusMessage = "Message loaded successful, cheers!";
                    }
                },
                function(error) {
                    $scope.statusMessage = "Error on loading: " + error.message;
                }
            );
    }
7. เสร็จสมบูรณ์
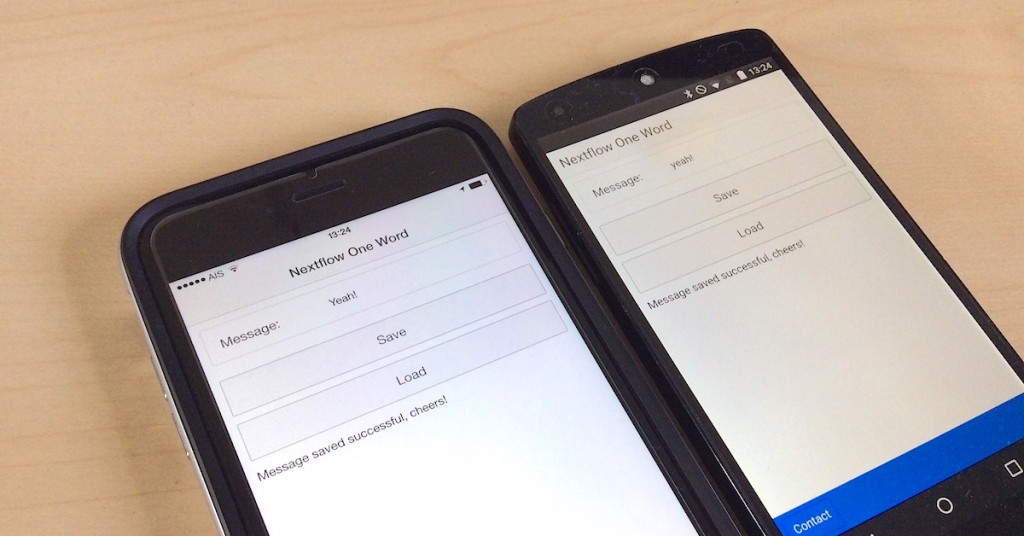
หลังจากเสร็จขั้นตอนการสร้างแล้ว ให้บันทึกไฟล์ทั้งหมดไว้ และทดสอบรันตัวแอพพลิเคชั่น Ionic Framework ลงในเครื่อง iPhone, iPad, และ Android ดู
ด้านล่างเป็นรูปแอพที่รันบน iPhone 6 Plus และ LG Nexus 5 ครับ

ตัวอย่างโปรเจคใน Github
สามารถดูตัวอย่างทั้งหมดของ Project ‘One Word Save’ ได้ใน Github ครับ
เหมาะสำหรับคนทำเว็บ, เริ่มต้น JavaScript ES6 และ Angular เข้าใจง่าย, ใช้ได้จริง สอบถาม หรือติดต่อจัดอบรมโทร 083-071-3373 โปรหน้าฝน! เรียนรอบสด รับคอร์สออนไลน์มูลค่ากว่า 5800 บาทฟรี!
เปิดอบรมสร้าง Cross Platform Mobile Application ด้วย Ionic Framework